Beginner's Guide to Yield Farming on BSC with PancakeSwap
Yield Farming is one of the hottest topics in the decentralized finance (DeFi) space right now. An innovative way to earn passive income, yield farming is turning out to be one of the most trending and profitable activities in the crypto world.
Although the first wave of cryptocurrency started with Bitcoin, the Ethereum blockchain fueled the second wave with its DeFi applications. But gaining even more popularity is the Binance Smart Chain and the host of Automated Market Makers (AMMs) and yield farms thriving on this ecosystem.
Binance is user-friendly, fast and efficient, and most importantly it costs much less than Ethereum. No wonder it’s a magnet for new entrants into this world.
With a cryptocurrency wallet such as Metamask and Yield Farming platforms like PancakeSwap, you can also be a pro at yield farming.
We have outlined a step by step guide to getting a Metamask Wallet and on how to connect your Metamask to PancakeSwap. Once that's done, follow the steps outlined to get your Liquidity Provider (LP) tokens and invest it in a yield farm of your choice.
Here’s a quick rundown of everything you’ll find in the article. Feel free to skip to any section of your choice.
- What is yield farming?
- How to find the right farm to invest in?
- Which wallet works best for the Binance Smart Chain?
- The Advantages of Metamask Wallet
- How to install and set up MetaMask?
- Connecting MetaMask Wallet to the Binance Smart Chain
- Yield Farming on PancakeSwap
- What is PancakeSwap?
- How to get BNB and CAKE tokens?
- Step-by-step guide to yield farming on PancakeSwap
And with that out of the way, let’s dive right into it!
What is Yield Farming?
To explain what yield farming is, let us think of traditional farming first. Think about how that works.
Ideally, the first thing you would do is to take some seeds and sow them in the soil. You would then take care of the seeds, nurturing and watering them from time to time. The single seed grows into a plant that eventually bears fruits (yielding more seeds).
But the time you need to spend on nurturing your plants isn’t much. For the most part, the plants seem to take care of their own growth as long as you check in on them once in a while ensuring they have all they need.
When it is time, you can do the harvesting and sell it off to make a tidy profit. How much profit or loss you end up with, depends on various other factors that govern the product’s market conditions.
Yield farming works in a similar, but much easier way. With cryptos, yield farming requires even less attention than the above scenario.
To get started with yield farming, you need two things: a cryptocurrency wallet and a yield farming platform.
All you need to do is to buy your favorite cryptos, find the perfect yield farm for them, and lock them on the farm. Some yield farms have a lock-in period so you’ll have to wait before you can take them out. But if your farm doesn't have a lock-in period, you're free to take out your cryptos whenever you want.
Ideally, you should keep your cryptos on the farm for at least a week or a month before pulling them out. This way, you allow your cryptos to generate some yield for you. So when you take your crypto back, you get the yield as well, thus making you profits.
Now let’s look at yield farming platforms.
How to Find the Right Farm to Invest in?
If you find yourself wondering how you can find the right farm to invest in, ask yourself a couple of questions. Nothing philosophical, I assure you. There are a few things you need to have a clear idea about, before you make this crypto investment.
1. Choose the right type of cryptos: Firstly, ask yourself if you trust the crypto tokens you're about to lock in the farm. This is very important because - ideally, you should be thinking in terms of months or even years. That's how long the lock-in periods usually are.
So you need to step back and think about whether the crypto you're about to lock in would stay put or not. If you think that it might not hold its value by the time your lock-in period ends, don't go for it.
2. Choose a trustworthy yield farming platform: Secondly, you need to ask yourself if you trust the yield farming platform or not. One of the primary rules of investing in cryptocurrency - use only the money you can afford to lose. If not, this is already a bad idea. Don't play with your life savings or pension funds. Even if you are willing to take the risk with some spare cash, it would still hurt to lose it because you locked it on yield farms on some shady website.
A good way to learn if the platform is safe or not is by going through the documents present on the website. More often than not, these platforms are gold mines of knowledge. From the ideals behind the project to its team members, you can know everything there is about the project.
Only if you're satisfied with everything should you go for the platform.
3. Check the Annual Percentage Yield (or APY): Finally, you need to think about the yield that the field is going to provide you. All farms mention the Annual Percentage Yield (or APY). You can find it along with a lot of other relevant information about the farm on the listing page.
The higher the yield, the more the profits you make with your cryptos. That said, it would be of no use if you end up losing all your money due to a bad cryptocurrency or platform.
4. Suggested Yield Farm: Now, I use PancakeSwap for yield farming, and I’ve seen great results from it, so I recommend it. But more than that, the reason I always recommend beginners to go for it is the fact that it is easy to use. In my experience, the complexity of the blockchain industry is what prevents most people from giving it a try.
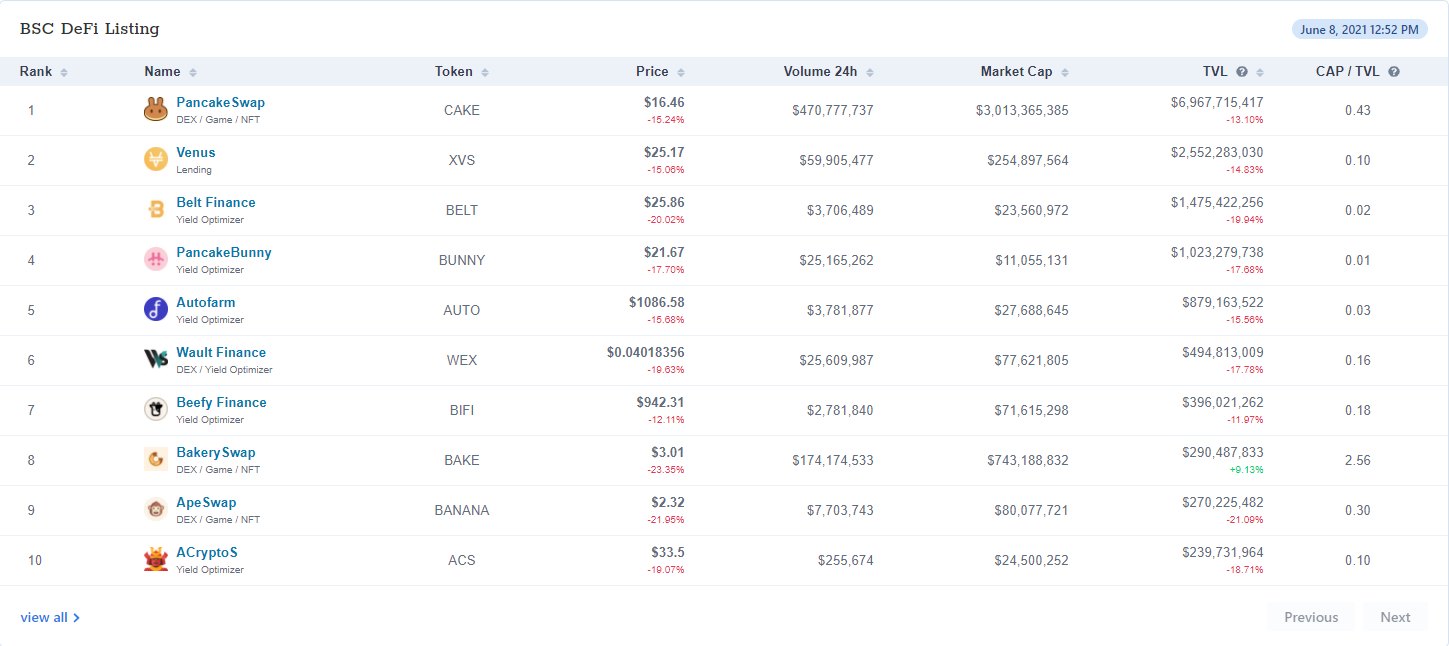
Source: Defimax
We’ll get to a step by step guide to using PancakeSwap for yield farming. But before you can start farming, you need something else in hand. So let’s get that first...
Which Wallet Works Best for the Binance Smart Chain?
Now that you know how to pick the right platform for yield farming, you would think you’re ready to invest. Unfortunately, you missed out on an important part of the process—picking up a BSC wallet.
I'm a huge fan of MetaMask, so I'm going to talk about that.
Now, you might be thinking, "isn't MetaMask an Ethereum-based wallet?" Well, you're right. It is an Ethereum-based wallet used mostly to store ETH and a lot of ERC-20 tokens. But in a few simple steps, you can tweak it to be used for your BEP-20 tokens as well.
The Advantages of Metamask Wallet
In case the name MetaMask didn't ring a bell, let me tell you a bit about what it is. Put simply, it is a browser plugin that is funded by ConsenSys, the Ethereum incubator.
- Supports Ethereum & BSC-based tokens: The reason why I love MetaMask is first, due to the fact that I can use it for both Ethereum & BSC-based tokens. So I don't have to maintain a separate wallet for each.
- MetaMask is open-source: So you can access the code for the crypto wallet online for free. While this might not mean much to the normal user, for developers this makes a world of difference. Not only does it build trust (because of the transparency), but it also gets them involved. The community can review and update the code to keep improving it.
- Great support: When it comes to community, MetaMask really puts them first. With an exhaustive support page, it takes the guesswork out of the experience of using it. Its million active users stand testimony to how good the platform is.
- Easily retrieve lost accounts: MetaMask uses hierarchical deterministic settings. This means that you can use your seed phrase to retrieve a lost account. This way, you don't end up losing even a single token in case you lose your device. Or format it, for that reason.
- Buy cryptos right from your wallet: MetaMask uses Coinbase (for ETH purchases) and ShapeShift (for ETH and ERC-20 token purchases).
How to Install and Setup MetaMask?
For Android and iOS users, the process of installing Metamask is pretty much the same as downloading and installing any other app.
1. Install Metamask: Just download the MetaMask app from Google Play Store or the Apple App Store and install it into your smartphone or tablet.
Similarly, Chrome users can find the plugin on the Chrome Web Store. Once you add it to Chrome, you’re good to go.
Firefox users need to visit the Addons store and search for the MetaMask plugin out there. Once found, you need to install the plugin.
2. Get Started: After installing the plugin, you would be taken to a welcome screen. This screen has the potential to keep you engaged for quite a while by simply moving the cursor and having the fox follow it. But if you aren’t easily amused, you could skip spending ten minutes playing with the fox and click on the ‘Get Started’ button.
This takes you to a new screen that asks you if you’re new to the platform or an experienced user.
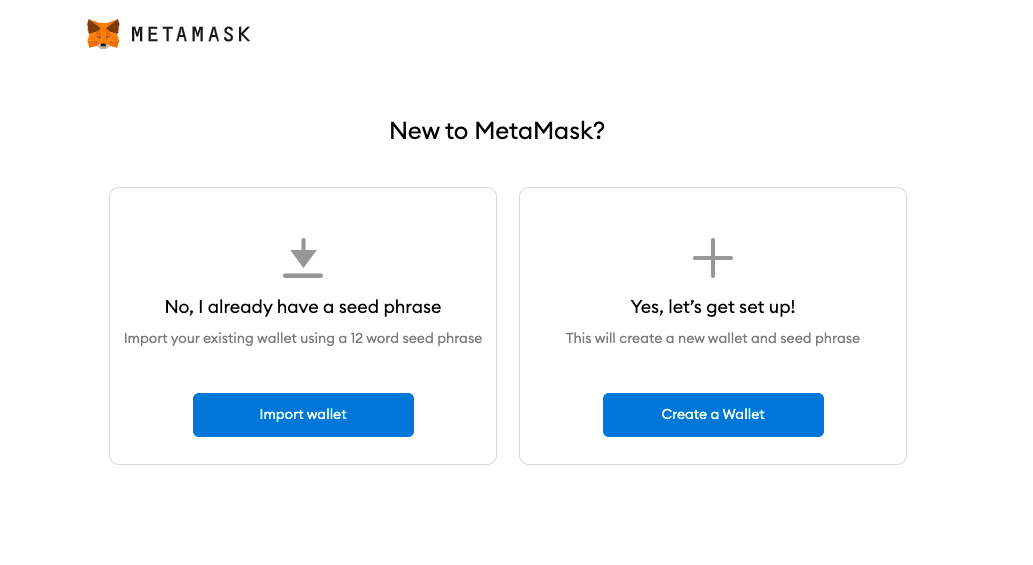
Since you’re reading this article, the chances of you being a new user are higher. So let’s take that route.
3. Click on the ‘Create a Wallet’ button: This would take to a screen wherein you’re asked if MetaMask can gather usage data. It does that to improve the usability of the platform and the experience it provides you.
That said, the choice is yours. You can always refuse by clicking on the ‘No Thanks’ button and you’ll be taken to the next screen.
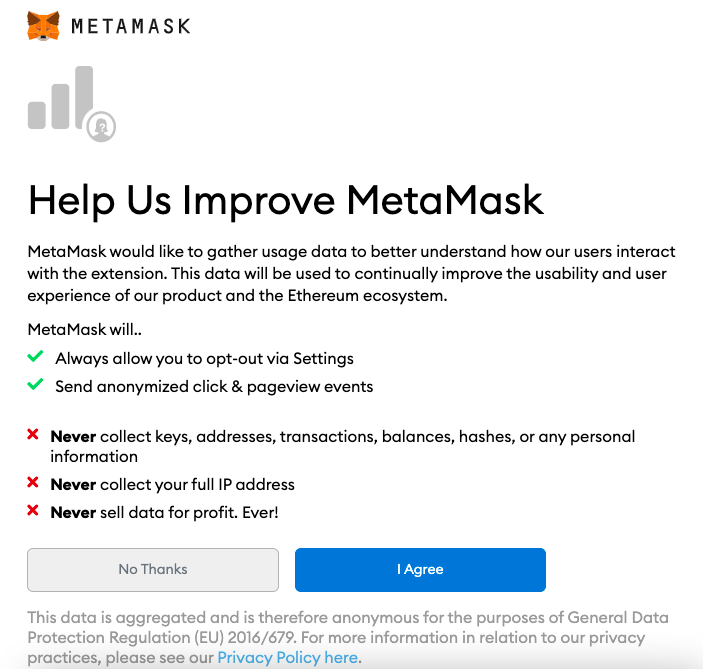
To support the platform, I’ve chosen to opt into it by clicking on the ‘I Agree’ button. Unlike certain tech giants, these guys don’t scoop up your personal data. All they get is anonymous usage data that they use for improving the platform on the whole.
4. Create a password: Now that you’re done with that, you need to create a password for your MetaMask wallet. The rules are nothing out of the ordinary here. They’re the same as you would find on any other platform.
Once you’ve entered and re-entered the password, it’s time for you to finalize things. Now, I’m sure you wouldn’t read the Terms of Use, but I always recommend doing that. Nevertheless, click on the checkbox next to the text that goes “I have read and agree to the Terms of Use”.
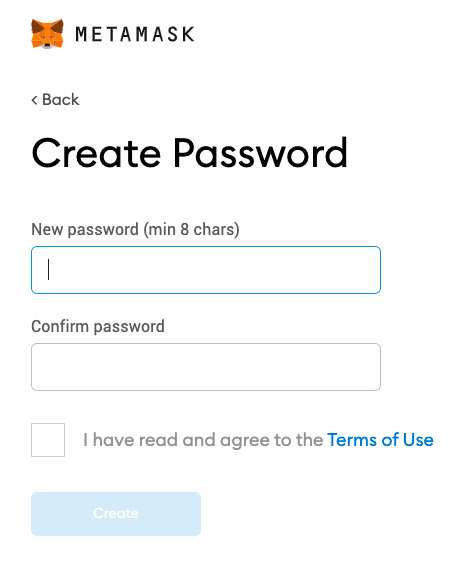
All you need to do now is click on the ‘Create’ button. Now you are the proud owner of a MetaMask wallet.
5. Get your seed phrase: While your account has been made, it isn’t secure yet. Sure, the password helps, but you still need to take care of the seed phrase. Clicking on the ‘Create’ button (on the password page) leads you to the screen that shows you your secret backup phrase. This phrase acts as the seed phrase you would need for importing your wallet in the future.
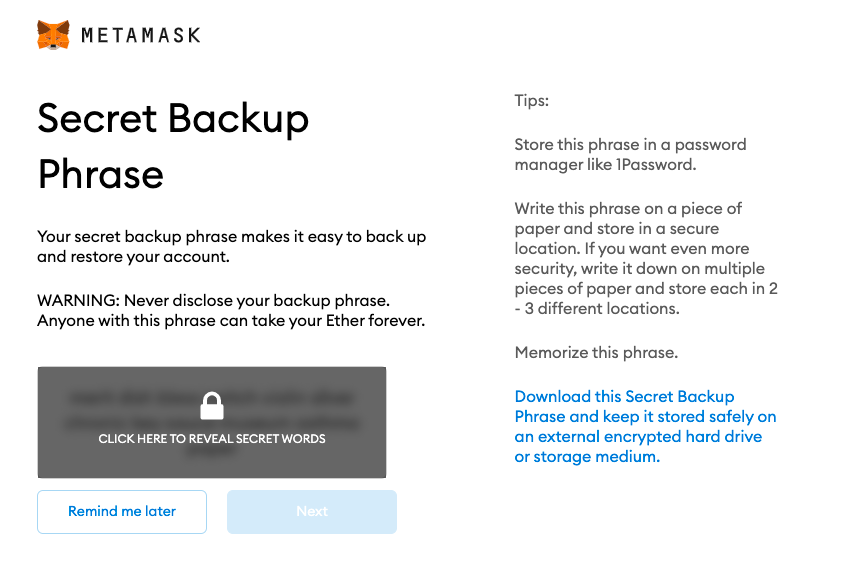
6. Store your seed phrase safely: Store the seed phrase in some place other than the device you're using for the wallet. You would be surprised at how many people store it on the same device. When they lose or format their device, they end up losing access to their wallet. So, I always recommend going for at least 3 copies of your seed phrase. Make sure that all three of them are stored in different locations.
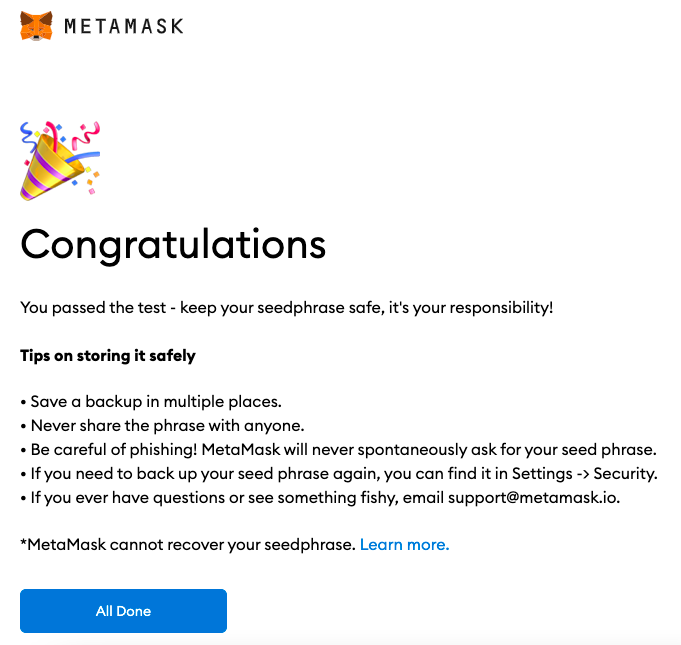
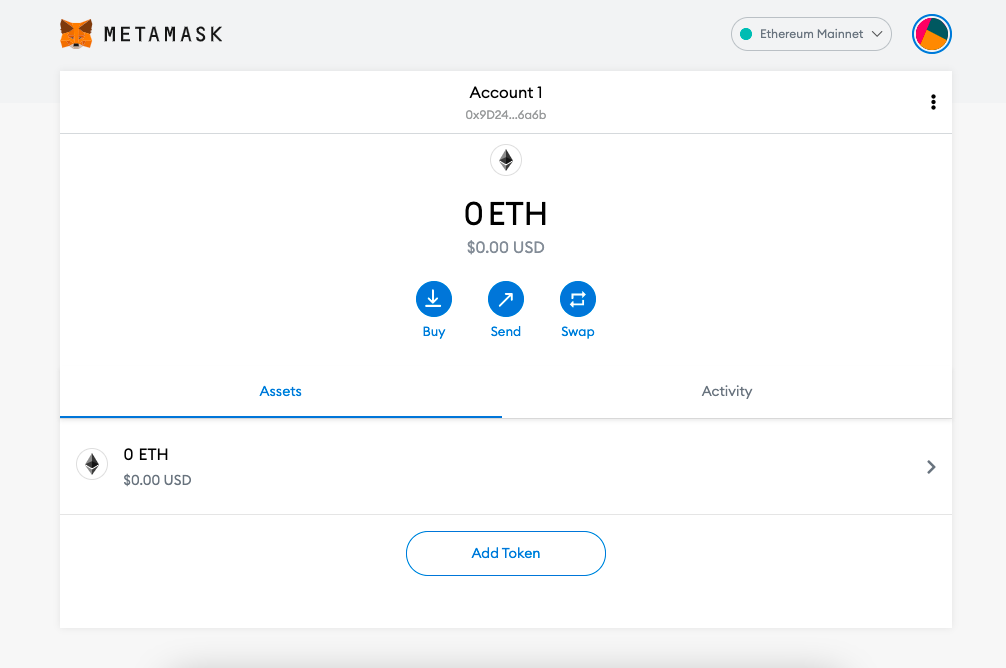
And that's it. You’ve successfully set up your MetaMask wallet. Pat yourself on the back!
You can now start sending and receiving funds in your wallet.
Connecting MetaMask Wallet to the Binance Smart Chain
As I’ve mentioned earlier, MetaMask usually deals with Ethereum. DApps working on the Binance Smart Chain would not work on the Ethereum wallet. Unless you want to lose your BEP-20 tokens, I wouldn’t recommend sending them to this wallet. But there’s a way to change that.
1. Hit the Settings option from the drop-down menu on the top right corner..

2. On the Settings page, click on the option that says ‘Networks’ from the menu on the left side. On this screen, you need to click on Add Network on the top right corner to add BSC manually.
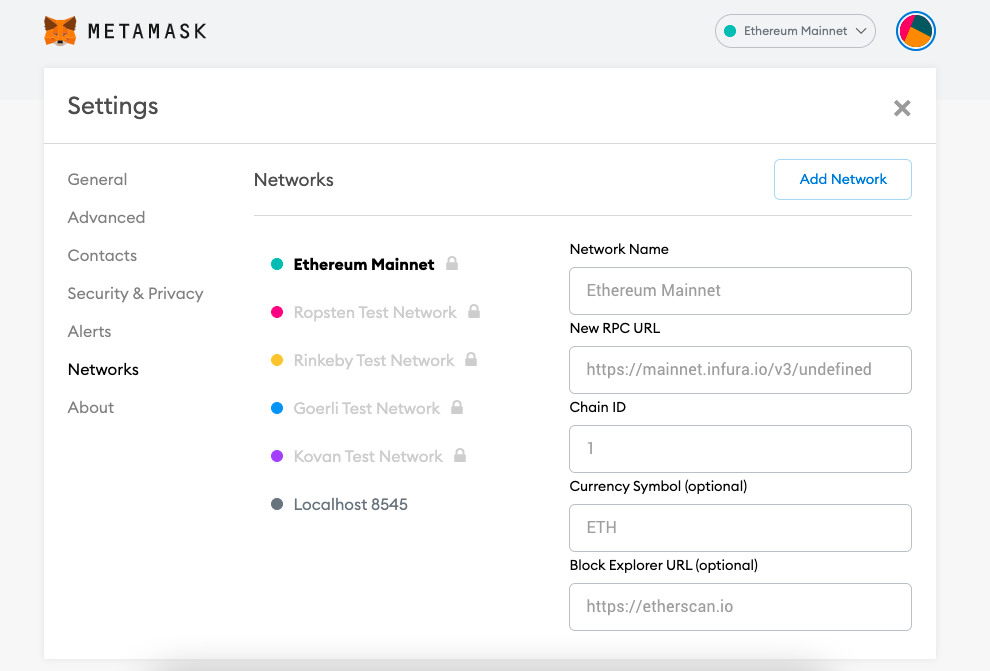
3. Adding the Mainnet is more than enough but if you want to be ready for any Testnet based tokens, you can always add that.
Here are the values for both:
Mainnet
- Network Name: Smart Chain
- New RPC URL: https://bsc-dataseed.binance.org/
- ChainID: 56
- Symbol: BNB
- Block Explorer URL: https://bscscan.com
Testnet
- Network Name: Smart Chain - Testnet
- New RPC URL: https://data-seed-prebsc-1-s1.binance.org:8545/
- ChainID: 97
- Symbol: BNB
- Block Explorer URL: https://testnet.bscscan.com
4. Hit save and you’ll be able to see BNB on your home screen instead of ETH. And with that, you’ve successfully configured your MetaMask Wallet to work with the Binance Smart Chain!
Yield Farming on PancakeSwap
If you are relatively new to cryptocurrency, why should you choose the Binance Smart Chain (BSC) instead of the more established Ethereum network?
Well, the BSC ecosystem is more suitable for beginners as it costs much less and is also faster than Ethereum. Another reason newcomers are flocking towards the Binance Smart Chain is because of Pancake Swap.
What is PancakeSwap?
PancakeSwap is a Decentralized Exchange (DEX) built on Binance Smart Chain. As the name suggests, you can swap your cryptocurrency assets utilizing user-generated liquidity pools on PancakeSwap,
PancakeSwap works as an automated market maker (AMM). In the traditional trading market, there is an order book which contains all the buy and sell orders placed on that platform. These prices are entered manually or electronically and then matched to execute the trades. For any seller, there has to be a buyer at the other end. If not, the trade does not happen.
DeFi and AMMs changed all that. On an AMM platform, you trade your digital assets against the liquidity pools containing user funds. The AMM is like a robot who determines the buy or sell price based on a fixed mathematical formula. This robot is always willing to quote you a price and is available 24/7. AMM relies on smart contracts. These are lines of code which makes the trades transparent, traceable, and irreversible
Learn more about Automated Market Makers and Liquidity Pools from our articles for beginners.
You can trade BEP-20 tokens on PancakeSwap. You can do many more activities such as adding to liquidity pools, staking your token or best of all - do yield farming to reap profits. For these activities you need liquidity pairs. For the purpose of explaining how yield farming works on Pancake Swap, I’m using a combination of BNB and CAKE Tokens. You can choose other combinations using USDT, BUSD, BELy, BUNNY, EPS, etc
How to get BNB and CAKE Tokens for Yield Farming?
So how do you do yield farming on PancakeSwap? The step would be getting some BNB and CAKE tokens.
All you need to do is go to your favorite exchange and buy some BNB & CAKE tokens out there. If your favorite exchange hasn’t listed them yet, you can always find them on Binance.
Once you have bought the desired amount of BNB & CAKE tokens, send them to your MetaMask wallet. Once your tokens are in the MetaMask wallet, they’re free to be used on the Binance Smart Chain.
Step-by-Step Guide to Yield Farming on PancakeSwap
Source: PancakeSwap
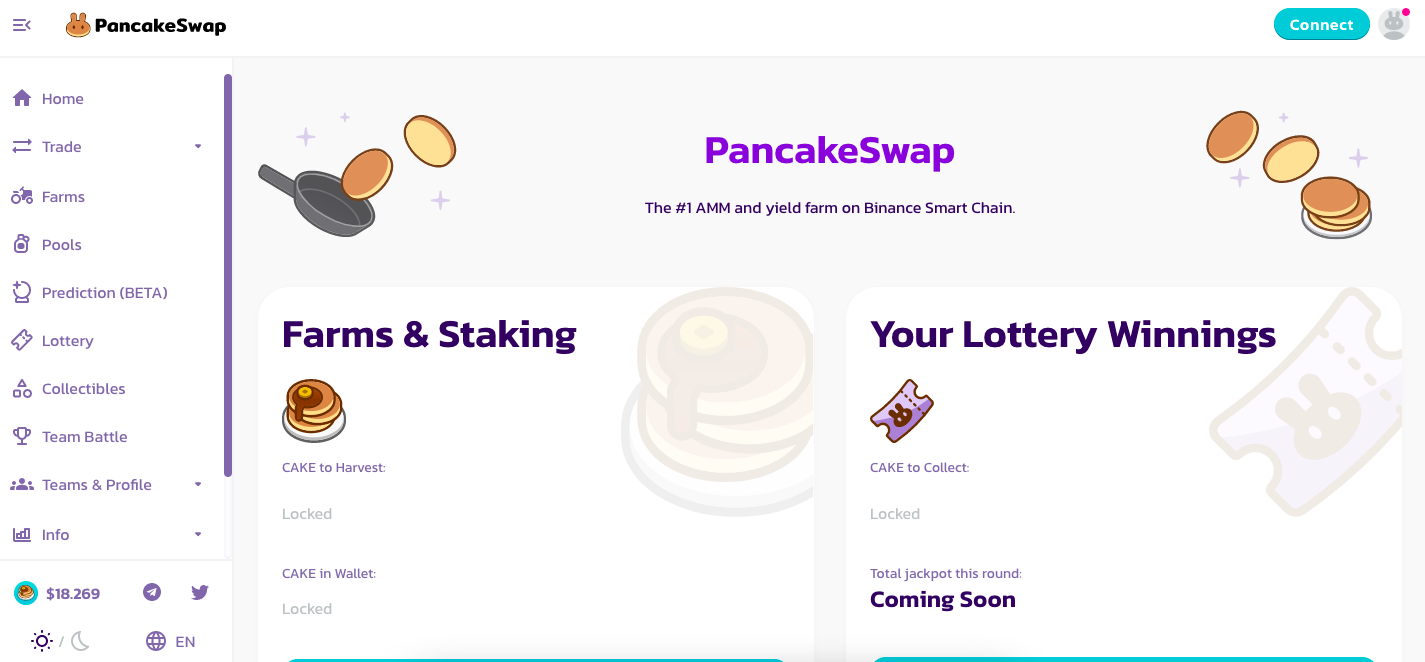
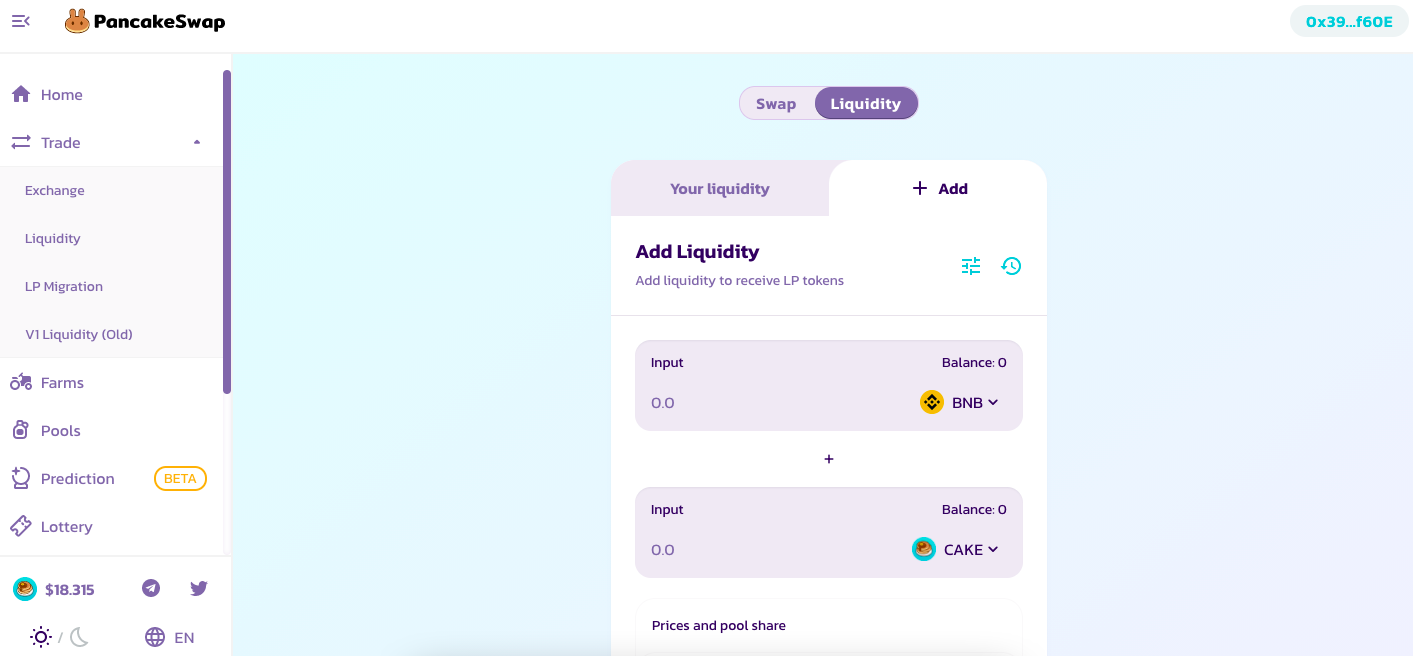
It is now time for you to head over to pancakeswap.finance.
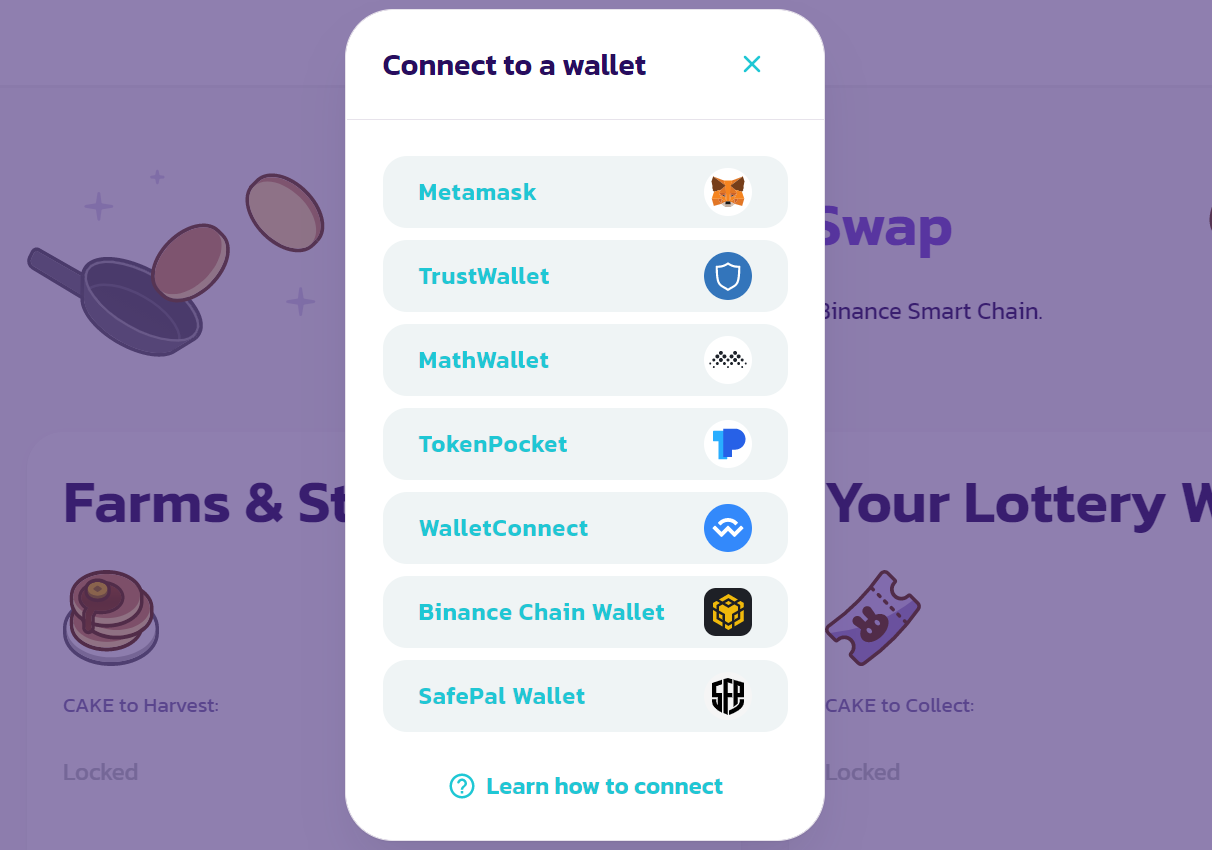
1. On the top right corner, you would find an option to connect your wallet with the platform. Click on the button and connect your MetaMask wallet by clicking on the “MetaMask” button on the popup window. It should be the first option out there.
2. Within a few clicks, you’ll have your wallet connected with the platform. It is now time for you to add liquidity to the CAKE-BNB liquidity pool.
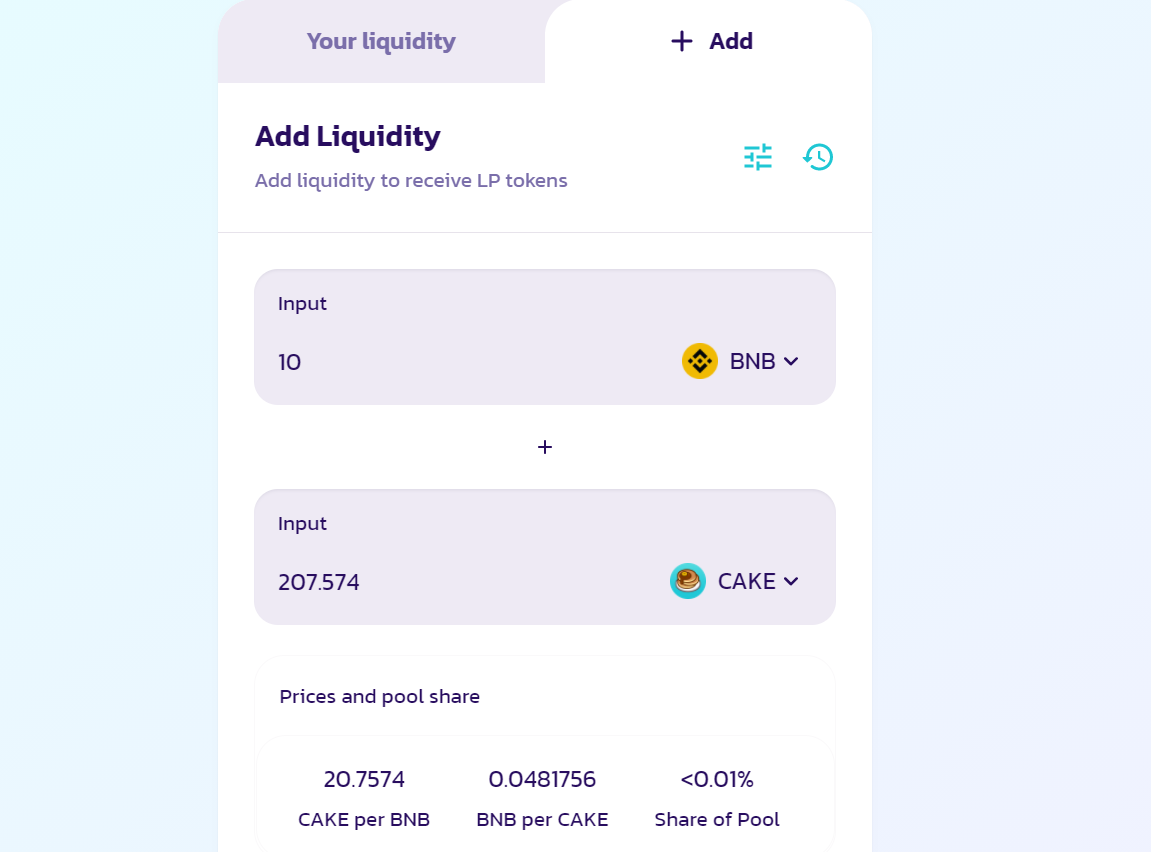
Source: PancakeSwap
When you add your input to the first column the second token quantity is automatically entered to reflect the same value. Here the value of CAKE per BNB is 20.7574. So for 10 BNB, you have to add 207.574 CAKE. Depending on how much you add, you now own a share of the pool. For every trade done using that liquidity pool, you receive a share of the fee charged for the trade. More importantly, you get CAKE-BNB LP tokens in return for the liquidity you provided.
Once you have the CAKE-BNB LP tokens, you’re free to use them for farming. So head over to Farms and lock your tokens in.
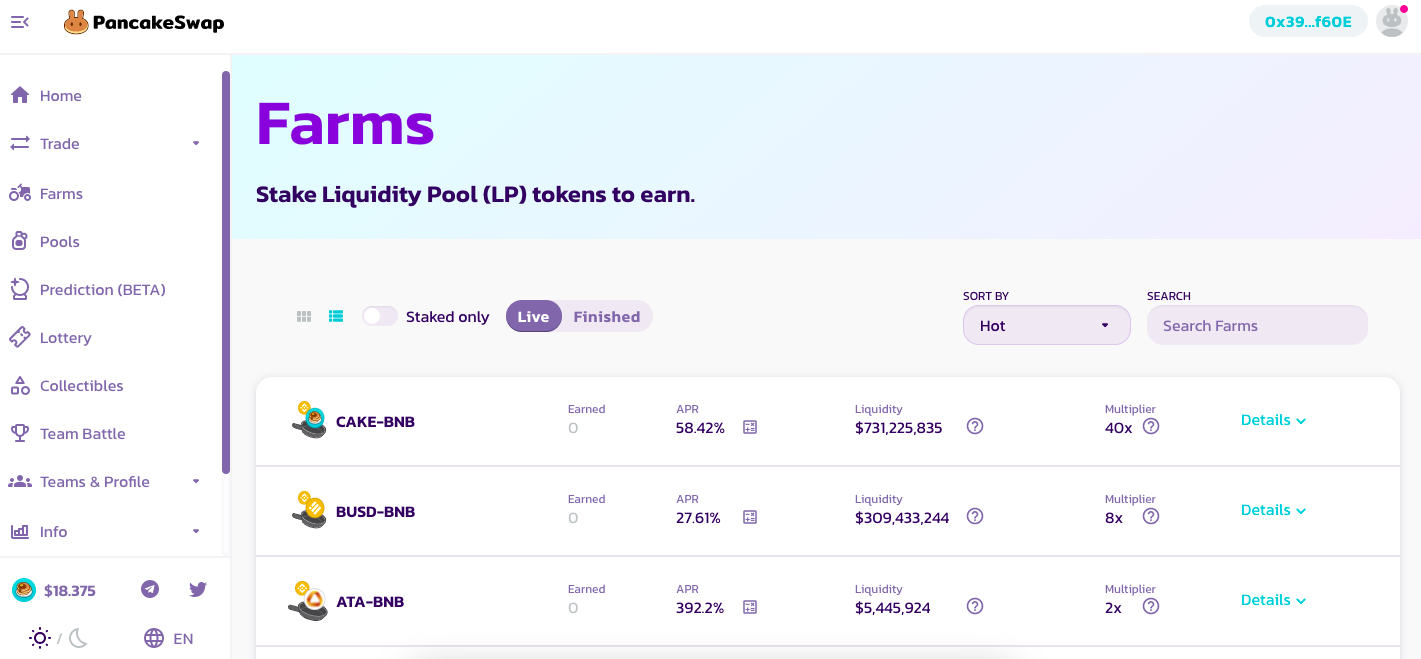
Source: PancakeSwap
As you can see, you have multiple farms to choose from. But we’re going to go for the first one, that is, the CAKE-BNB farm. So, click on the farm and hit the button that says Enable.
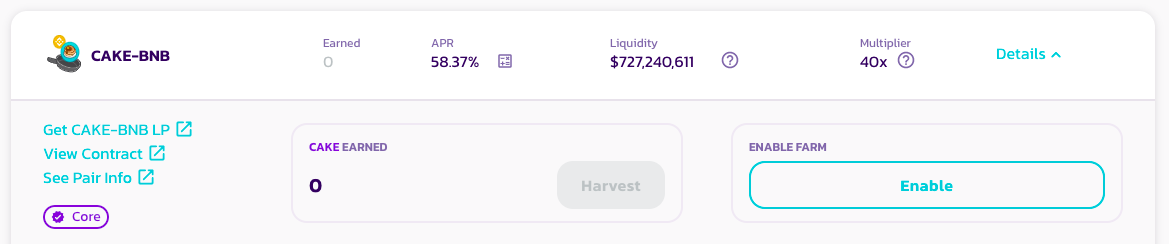
Source: PancakeSwap
This would cost you a transaction fee of $0.12 but once you’ve locked your tokens in, you can harvest the yield.
And there you have it, you are now officially a yield farmer on the Binance Smart Chain!
You can reap your rewards in the form of CAKE tokens. You can check anytime to see how much CAKE you have earned. Click on the ‘Harvest’ button next to it anytime you want to take out your profits. You will be asked to confirm the transaction and once you do that, its all yours to do as you wish.
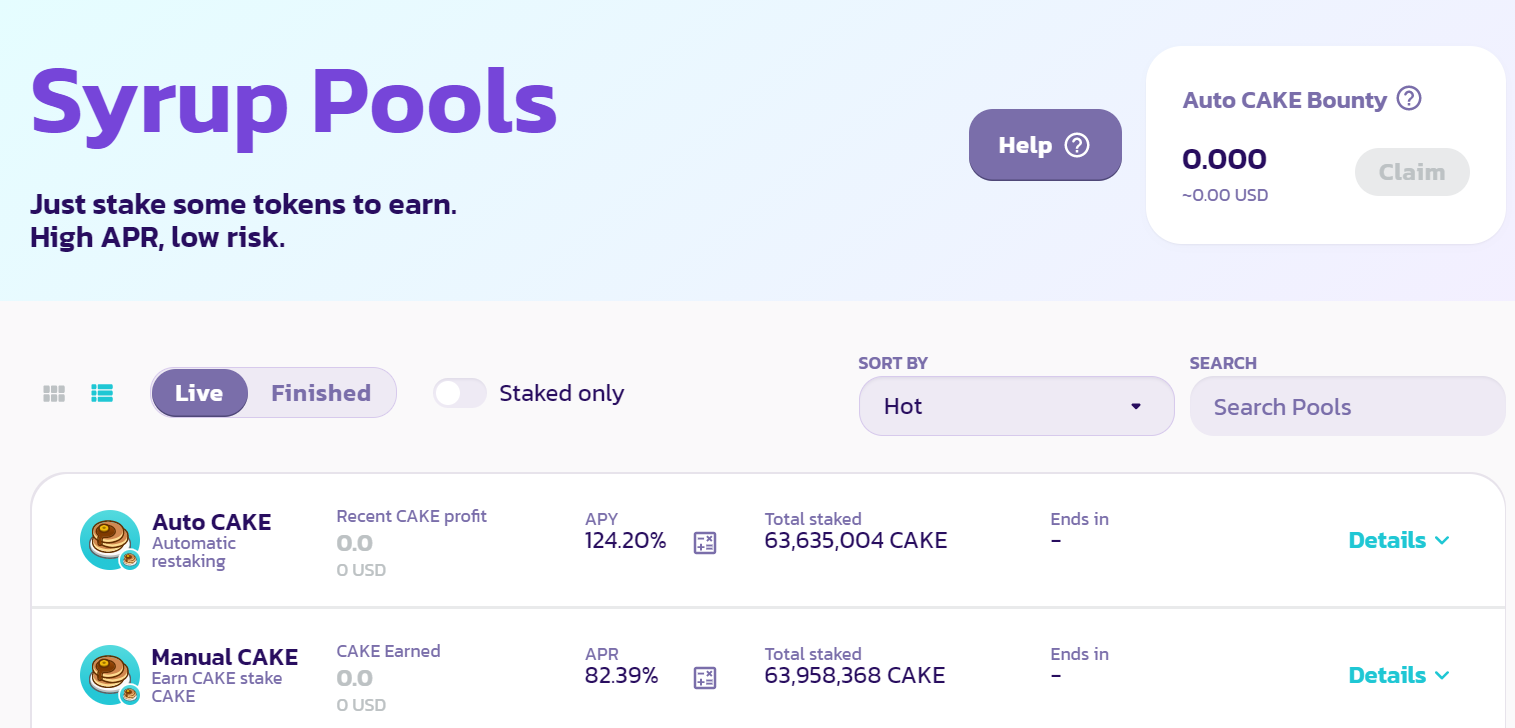
You can further stake the CAKEs you have earned, Syrup Pools, to mint even more rewards. Let the Games Continue…
If you want to learn more about Pancake Swap and everything else you can do on this platform, then read our Beginner’s Guide to PancakeSwap.
Before You Go…
Being relatively new, the Binance Smart Chain has a lot to offer. The blockchain’s low transaction fee and network congestion have incentivized many developers to build on it. And yield farming is just one of the results of that.
While it seemed like just a fad back when it first came around, things have changed. Yield farming is showing quite some promise and it seems like it is here to last. So if you’re an investor banking on the APY of your farm, you’re in luck!
Don’t worry even if you are new to the world of liquidity pools and yield farming. Use our step by step guide and become a pro at yield farming on the Binance Smart Chain.